25 Jan 2024
A Step-by-Step Guide to Making Homemade Essential Oil Candles
Candles have long been used to create a warm and inviting atmosphere, and when combined with essential oils, they offer a delightful way to enjoy the benefits of aromatherapy. Making your own essential oil candles allows you to customize scents according to your preferences while reaping the therapeutic benefits. In this article, we will guide you through the process of making your own essential oil candles, highlighting the best essential oils for candle making and their associated aromatherapy benefits.

What Materials Do You Need to Get Started?
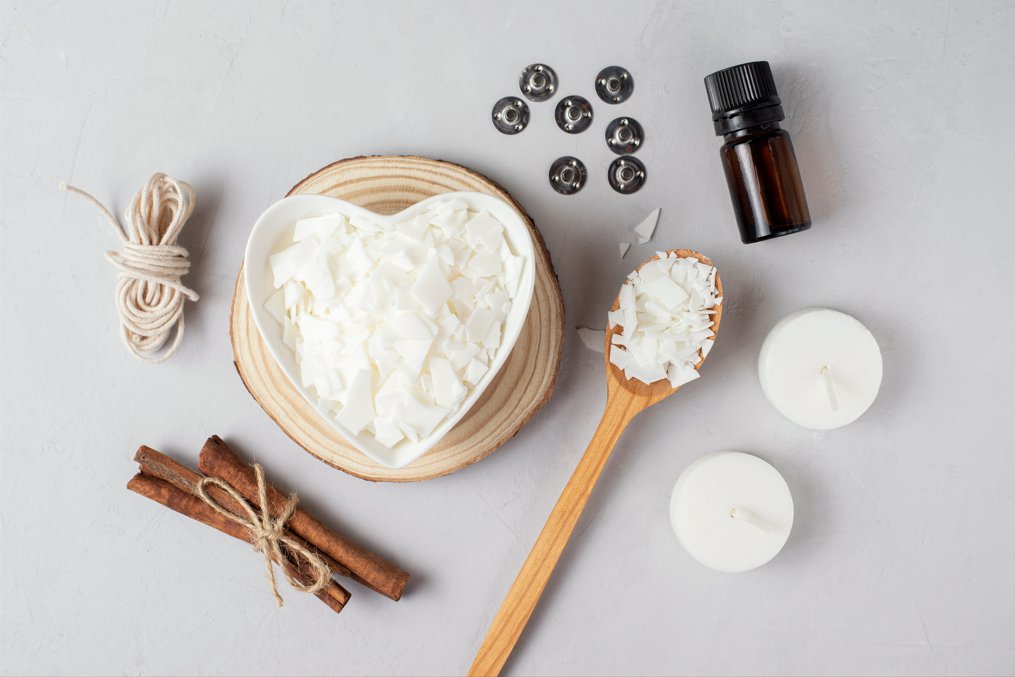
In order to make essential oil candles at home, you’ll need a few materials, including:
- Candle wax (soy wax or beeswax), 1 cup per 4 oz jar/tin
- Candle wicks (1 per jar/tin)
- Essential oils of your choice (see below for recommendations)
- Candle containers (glass jars or tins, feel free to reuse)
- Double boiler or a heat-resistant container
- Thermometer
- Stirring utensil (wooden spoon or popsicle stick)
- Clothespin or wick holder
- Optional: Candle dye or natural colorants
- Optional: Decorative elements (dried flowers, herbs, or spices)
How to Make Homemade Essential Oil Candles
Making essential oil candles is fairly easy – simply follow these steps:
Step 1: Prepare Your Workspace
Before you begin, ensure you have a clean and clutter-free workspace. Cover the area with newspaper or a protective sheet to catch any spills or drips. Gather all the necessary materials and tools to have them within easy reach.
Step 2: Melt the Wax
Using a double boiler or a heat-resistant container placed in a pot of boiling water, melt the candle wax. As a general recipe, 1 cup of wax will yield one 4 oz candle. If you have a larger jar or tin or would like to make multiple candles, simply increase the recipe proportionately.

If you are using a double boiler, fill the bottom pot with water and place the wax in the top pot. Heat the water on low to medium heat until the wax melts completely. Stir occasionally to ensure even melting. Use a thermometer to monitor the temperature, aiming for around 160-180°F (70-82°C).
Step 3: Choose the Right Essential Oils
Selecting the right essential oils is crucial for creating an inviting and therapeutic atmosphere. Here are some popular essential oils for candle making and their associated benefits:
- Lavender: Lovely floral scent, promotes relaxation, reduces stress, and aids in better sleep.
- Eucalyptus: Fresh and cooling aroma, clears the mind, promotes clear breathing, and boosts energy.
- Peppermint: Enhances focus and invigorates the senses.
- Citrus (such as orange, lemon, or grapefruit): Bright and cherry aroma, uplifts mood, reduces tension, and promotes a positive atmosphere.
- Rosemary: Herbaceous scent, improves mood, stimulates mental clarity, and reduces fatigue.
- Cedarwood: Woodsy aroma, calms the mind, grounds the spirit, and promotes relaxation.

When choosing essential oils for your candles, ensure they are 100% pure,
USDA Organic, and either cold-pressed or steam-distilled. Cliganic offers a range of essential oils that check all these boxes – feel free to mix and match with different scent combinations to find the right aroma for your needs.
Step 4: Add Essential Oils
Once the wax has melted, remove it from the heat source and let it cool slightly. Add ~3-5 drops (per 1 cup of wax) of your chosen essential oils to the melted wax. Start with a few drops and adjust according to your preference. Stir the mixture gently to distribute the oils evenly throughout the wax.
Step 5: Prepare the Candle Containers
While the wax cools, prepare your candle containers. Place the wick in the center of each container, using a clothespin or wick holder to keep it upright. Ensure the wick is long enough to reach the bottom of the container.
Step 6: Pour the Wax
Carefully pour the wax into the prepared candle containers, ensuring the wick remains centered. Leave a small gap at the top to allow for any decorative elements you may want to add later. If desired, you can add candle dye or natural colorants to achieve your desired hue.
Step 7: Let the Candles Set
Allow the candles to cool and set for several hours or overnight. The cooling time will depend on the size of the candles and the ambient temperature. Avoid moving or disturbing the candles during this time to ensure a smooth and even finish.
Step 8: Add Decorative Elements (Optional)
Once the candles have solidified, you can add decorative elements to enhance their appearance. Consider placing dried flowers, herbs, or spices on the surface of the candle before it completely hardens. This will create a beautiful visual effect when the candle is lit.
Step 9: Trim the Wick
Before lighting your essential oil candles, trim the wick to approximately ¼ inch in length. This will help the candle burn evenly and prevent excessive smoke.
If you’re giving a candle as a gift, try wrapping twine or a bow around the neck of the candle for added decoration.
Final Thoughts
Making your own essential oil candles not only allows you to create a cozy ambiance but also provides the added benefits of aromatherapy. By selecting the right essential oils, you can enhance relaxation, boost energy, improve focus, and create a positive atmosphere in your home. So, gather your materials, unleash your creativity, and start making your own essential oil candles for a delightful aromatherapy experience today. For more ideas on essential oil DIYs, check out this article: Homemade Holiday Gift Ideas with Essential Oils.


